
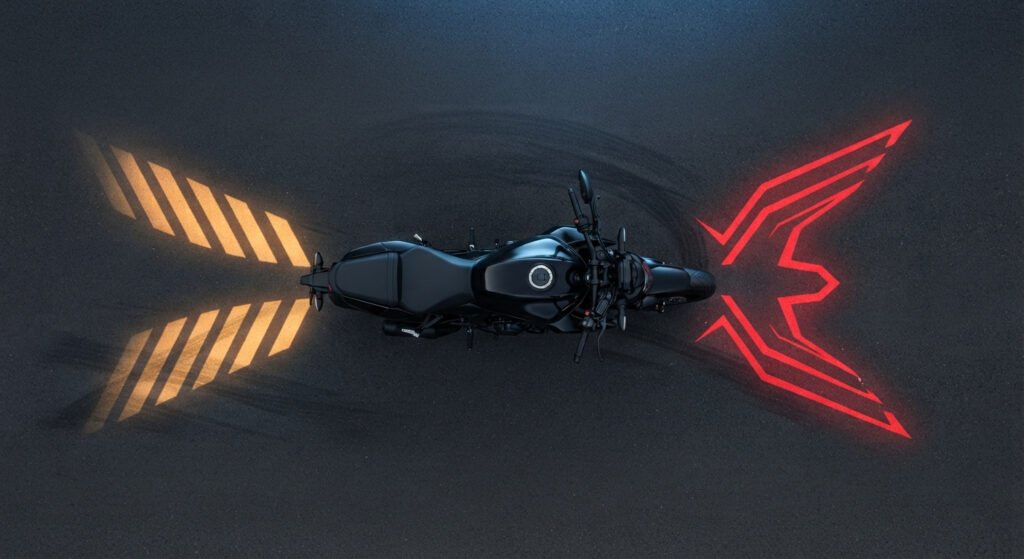
TL;DR
An optical projection lens for motorcycle lights takes a small LED source and focuses it into a sharp pattern on the road, such as an arrow, a warning shape, or a logo. The lens matters as much as the light itself, because sharpness, brightness, and pattern shape all depend on it. Since a motorcycle leans, pitches, and vibrates, look for a lens that stays stable on a moving bike, and test it at night on your own machine before you commit.
Quick Answer
An optical projection lens for motorcycle use is the lens element in a projection light that turns an LED source and a pattern into a focused image on the ground. Its focal length, aperture, material, and coatings decide how sharp, bright, and large the pattern appears. On a motorcycle it also has to cope with vibration, weather, heat, and constantly changing angles, so durability matters as much as optical quality.
Introduction
Look at a motorcycle from the side and you will see how little room a designer has to work with. There is a slim tail section, a small headlight, and not much else. Anything you add has to be compact, light, and tough.
That is why the lens inside a projection light deserves more attention than it usually gets. People compare lumens and colors, then treat the lens as a piece of clear plastic. In practice, the optical projection lens for motorcycle lights decides whether the pattern on the road looks crisp or smeared.
This guide explains how an optical projection lens for motorcycle lighting works, why a bike is such a demanding platform for one, and which types exist. It also covers materials, the specs that actually matter, safety and legal points, and how to test a lens before you buy.
What Is an Optical Projection Lens for Motorcycle Lighting?
An optical projection lens for motorcycle lighting is the lens or lens group that forms a visible image on the road from a compact light module. Think of a slide projector, shrunk down and built to survive rain and vibration.
A typical projection module has four parts. There is a light source, usually an LED. There is an element that gathers and shapes the light, often called a collimator or condenser. There is the pattern itself, which can be a mask, a film, or an array of tiny lenses. And there is the projection lens, which focuses the result onto the ground.
The lens is the last stage, but it does the visible work. If it is poorly made or poorly matched to the rest of the module, even a good LED and a clean pattern produce a blurry result.
You will run into several related terms. “Motorcycle projection lens,” “projector lens,” “ground projection optics,” and “micro lens array” all describe parts of the same family. The differences lie mostly in how the pattern is formed, which later sections cover.
How an Optical Projection Lens for Motorcycle Lights Works
The path through an optical projection lens for motorcycle lights is simple to describe. Light leaves the LED, gets gathered and evened out, passes through or around the pattern, and is then focused by the lens onto a surface a short distance away.
From LED to Pattern
An LED sends light out in a wide cone. If that light went straight to the lens, most of it would be wasted and the image would look patchy. A collimator or condenser gathers the light and directs it through the pattern more evenly.
Forming the Image
At the pattern stage, the light takes on a shape. A traditional design uses a mask, such as a thin plate with a cut-out or printed image. Other designs use arrays of small lenslets that build the image together.
Focusing on the Road
The optical projection lens for motorcycle modules then focuses that shape at a set distance. It produces its sharpest image at the distance it was designed for, and the pattern grows larger as that distance increases. On a motorcycle, the design distance is usually the gap between the module and the road, so it depends on mounting height and angle.
One small detail explains a common surprise. A simple lens flips the image, so designers reverse the pattern inside the module. That is why a test pattern can look backwards when you inspect the module by hand.
Why a Motorcycle Is a Hard Place to Project Light
A car sits fairly steady relative to the road. A motorcycle does not. Four things make the job of an optical projection lens for motorcycle lighting harder than it looks.
The Angle Is Steep
The module is mounted low and projects down and outward. Projecting at an angle stretches the image, an effect called keystone distortion, where a square turns into a trapezoid. Designers compensate through the pattern or the lens design so the shape looks right to the people who see it.
The Bike Leans
In a corner, the motorcycle leans, and so does the light. The pattern moves and can tilt. A shape meant for straight-line braking may look quite different at a lean angle, which is why placement and pattern choice matter.
The Suspension Moves
Under braking the front dips, and under acceleration the rear squats. The distance to the road changes, so the pattern shifts in size and sharpness. A lens that tolerates some change in distance copes better than one tuned to a single exact figure.
Vibration, Heat, and Weather
A motorcycle shakes, bakes in the sun, gets rained on, and gets washed with a hose. The lens, its seals, and its mounting take all of it. Bench-top optical quality means little if the module fogs up after a month of riding.
None of this is unsolvable. It is simply a good reason to judge an optical projection lens for motorcycle use in real conditions and not only on a spec sheet.
Types of Projection Optics Used on Motorcycles
Not every projection light forms its image the same way. Two approaches are common, and knowing both helps you read the product description of any optical projection lens for motorcycle lights.
Conventional Mask-and-Lens Projection
This is the classic design. A mask defines the pattern, and a lens or lens group focuses it. It is easy to understand and can produce sharp, detailed images.
The trade-off is size. A conventional optical projection lens for motorcycle modules needs some distance from the mask to work well, and brightness is limited by how much light passes through it.
Micro Lens Array (MLA) Projection
Micro lens array designs turn the optical projection lens for motorcycle use into a thin array of tiny lenslets, replacing the single mask and large lens. Each lenslet forms a small copy of the pattern, and the copies overlap to make one image. The result can be a thinner module with an even, bright pattern.
The usual trade-off is flexibility. The pattern is typically built into the array, so changing it can mean new tooling instead of swapping a mask. That suits a fixed logo or warning arrow, and it is less convenient if you change designs often.
| Feature | Mask-and-lens | Micro lens array |
|---|---|---|
| Module thickness | Usually thicker | Often thinner |
| Pattern change | Easier, swap the mask | Usually needs new tooling |
| Image evenness | Depends on the condenser | Often very even |
| Best suited to | Detailed or frequently changed patterns | Compact modules with fixed patterns |
Neither approach wins in every case. The right choice depends on how much space you have and whether the pattern will change.
Lens Materials and Coatings
Material decides how an optical projection lens for motorcycle use ages, so it deserves a look before you choose.
Glass is optically stable and resists scratches and heat well. It costs more, weighs more, and can break under impact.
Acrylic (PMMA) is clear, light, and easy to mold into precise shapes. It scratches more easily than glass and can be affected by heat over time.
Polycarbonate is tough and impact resistant, which suits an exposed, vibrating location. It needs a proper coating to resist UV yellowing and scratches, and some grades show more color fringing at the edges.
| Material | Strengths | Watch out for |
|---|---|---|
| Glass | Stable, scratch resistant | Cost, weight, brittleness |
| PMMA (acrylic) | Clarity, easy molding | Scratches, heat over time |
| Polycarbonate | Impact resistance | UV yellowing without coating |
Coatings matter as much as the base material. An anti-reflective (AR) coating reduces light lost at the lens surfaces and cuts stray reflections, so more of the LED’s output reaches the road. A hard coat protects plastic from scratches, and a UV-resistant layer slows yellowing.
Ask the supplier which coatings are used and what tests they passed. “High-quality material” is not an answer.
Specs Worth Understanding Before You Buy
Spec sheets throw a lot of numbers around. For any optical projection lens for motorcycle lighting, these are the ones that change what you actually see on the road.
Focal Length and Throw Distance
Focal length affects how large the pattern appears at a given distance. A shorter focal length generally gives a larger image at the same distance. Together with mounting height, it sets the pattern size on the road.
Aperture and Brightness
A wider aperture, which means a lower f-number, lets in more light and makes the pattern brighter. It can also make it harder to keep the edges sharp. A narrower aperture usually improves sharpness at the cost of brightness. Designers balance the two.
Lumens Versus Lux
Lumens measure how much light the source emits. Lux measures how much lands on a surface. A projection light concentrates its output on a small area, so the lux at the pattern is what you see. Two modules with the same lumens can look very different on the road because of their optics.
Sharpness, Distortion, and Color Fringing
Check the edges of the pattern. Soft edges point to a focus problem. Color fringes suggest chromatic aberration. Bent lines suggest distortion the design did not correct.
Pattern Size
Some published product pages list motorcycle projection patterns from roughly 0.6 m to 1.8 m in length. Treat figures like these as design targets that depend on mounting position, not as fixed promises.
Where an Optical Projection Lens for Motorcycle Use Is Applied
Most projection lights on bikes do one of a few jobs.
Warning and signaling. With hazard lights on, some modules project arrows or shapes onto the road to alert pedestrians and other drivers. Brake and turn-related patterns work on the same idea.
Visibility. A pattern projected behind or beside the bike can make it more noticeable at night, though it does not replace the required lighting.
Branding and welcome effects. A logo or short pattern when the bike powers on or off is popular with modifiers and accessory makers.
Commuters, touring riders, and customizers all use them for different reasons. Keep expectations realistic, because a projected pattern is an added signal and not a substitute for careful riding.
Safety, Legal, and Responsible Use
Whichever optical projection lens for motorcycle lighting you pick, rules for projected light differ by country and sometimes by state. Some places restrict patterns projected onto the road, flashing lights, certain colors, or anything that could distract or dazzle other road users.
Check your local vehicle lighting regulations before installing, and check the target market’s rules before selling. If you are unsure, ask the relevant authority.
Never replace or block mandatory lights such as the headlight, brake light, or turn signals with an accessory. A projection module should add to the required lighting.
Installation involves wiring. If you are not comfortable with vehicle electrics, have a qualified technician fit it and follow the manufacturer’s instructions. Poor wiring can damage the electrical system or create a fire risk.
How to Choose an Optical Projection Lens for Motorcycle Lighting
Start with the job, not the datasheet.
Decide what the pattern is for. A warning arrow, a rear visibility zone, and a decorative logo need different sizes, brightness levels, and placement.
Work out where the module will be mounted. Height and angle set the pattern’s size and shape. Ask the supplier for pattern dimensions at your mounting height, not only at a default one.
Look at durability. Ask about sealing and the ingress protection rating of the optical projection lens for motorcycle assembly, and ask what test that rating refers to. Confirm the operating temperature range and whether vibration testing was done.
Check the material and coatings as covered above. A cheaper plastic lens may be fine on a small commuter bike and poor on a machine that sits in strong sun.
Think about customization. If you need a custom logo or pattern, ask about tooling cost, minimum order quantities, and lead times up front.
Finally, look at support. A supplier who can share test data, samples, and documentation is far easier to work with than one who cannot.
Test It on Your Own Motorcycle
A bench photo shows the best case. Ask for a sample and test the optical projection lens for motorcycle use at night on a real bike.
Check the sharpness of the pattern on dry and wet asphalt. Look at it from where other drivers would see it, not only from the saddle. Try it under braking and at a moderate lean, and note how much it shifts. Then leave it out in the rain, wash the bike, and inspect the module for fogging.
Run tests only where it is safe and legal, and never in a way that dazzles or distracts other people.
Common Problems and What They Usually Point To
Even a good optical projection lens for motorcycle lighting shows faults sometimes, and most trace back to a short list of causes.
A blurry pattern usually points to focus. The module may be mounted at a height different from its design distance, or the lens may be misaligned or dirty.
A dim pattern can come from a weak source, poor coatings, dirt on the lens, or a road surface that reflects little light. Dark, wet asphalt behaves very differently from dry concrete.
Fogging inside the module suggests a seal problem. Moisture and optics do not mix, so treat this as a warning about build quality.
Change one thing at a time when troubleshooting. Adjust the mount, then clean, then check the seals, so you know which change actually worked.
Care and Maintenance
Care for an optical projection lens for motorcycle lights is simple. Clean it with a soft cloth and mild soapy water, and avoid harsh solvents and abrasive pads, which can cloud plastic and damage coatings.
Check the seals and mounting after rough rides or pressure washing. If the pattern gets weaker over time, inspect the lens and seals before assuming the LED is failing.
Conclusion
An optical projection lens for motorcycle lighting is where light turns into a message on the road. Its quality decides whether that message is sharp and useful or soft and forgettable.
Because a bike leans, pitches, and shakes, judge any optical projection lens for motorcycle use in real conditions. Match the design to the job, check the material, coatings, and sealing, and confirm the rules where you ride or sell.
Get a sample, test it at night on your own bike, and ask direct questions about tolerances and testing. Choices made that way tend to hold up long after the purchase.
FAQs
What is an optical projection lens for motorcycle lights?
It is the lens in a projection light that focuses an LED source and a pattern into a sharp image on the road. It decides how large, bright, and clear the pattern looks.
How far can an optical projection lens for motorcycle lights project a pattern?
That depends on the mounting height, the lens design, and the pattern. Most motorcycle modules project onto the ground a short distance away, and some published specifications list patterns roughly 0.6 m to 1.8 m long. Confirm figures for your mounting position with the supplier.
Is glass or plastic better for an optical projection lens for motorcycle use?
Neither is better in every case. Glass is stable and scratch resistant, but heavier and more brittle. Plastics such as acrylic and polycarbonate are light and easy to mold, and they need good coatings to resist scratches and UV.
Are motorcycle projection lights legal?
It varies by country and region. Some places restrict projected patterns, flashing lights, or certain colors. Check local vehicle lighting regulations before installing or selling one.
Why does my projected pattern look blurry?
The most common causes are a mounting height different from the design distance, a dirty or misaligned lens, or a lens that is not sharp at the edges. Check the mount and clean the lens first.