
TL;DR
A motorcycle MLA projection light uses a small LED, a pair of micro lens arrays and a patterned slide to cast a sharp logo or shape onto the ground. Dozens of tiny lens channels each project the same image, and the images overlap into one bright, even picture. This guide explains each part, how it behaves on a real bike, and what affects image quality.
Quick Answer
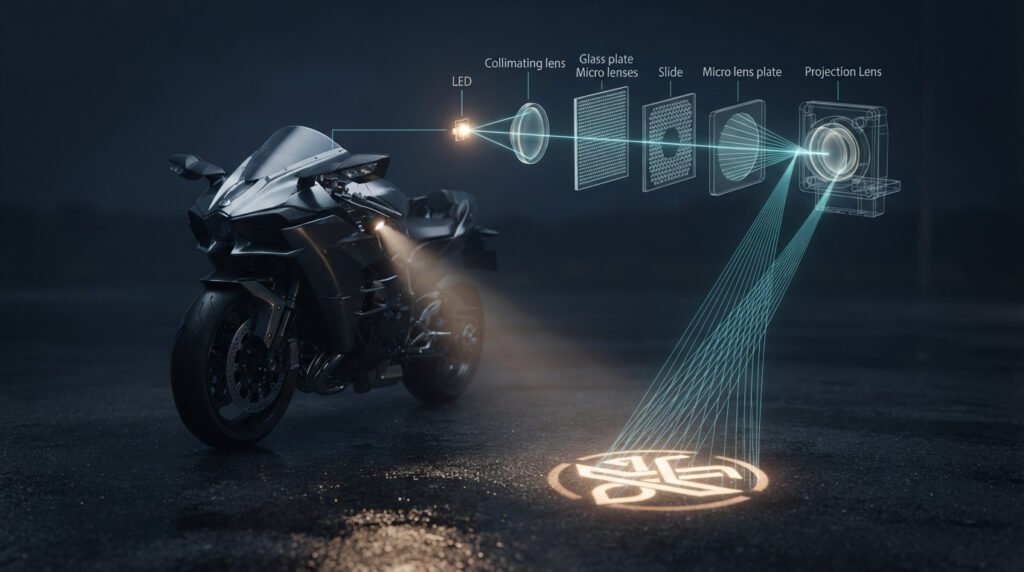
How do motorcycle MLA projection lights work? An LED emits light, a collimating lens straightens it, and a first micro lens array splits it into many small beams. These beams pass through a patterned slide, and a second lens array with a projection lens throws each small image toward the ground. The overlapping images merge into one bright, evenly lit logo or pattern, in a module that stays thin enough to hide under a mirror or body panel.
Introduction
You have probably seen it. A rider walks up to a bike, the key turns, and a crisp brand logo appears on the pavement beside the machine. It looks simple, almost like magic.
It is actually careful optics. Understanding how motorcycle MLA projection lights work helps designers choose the right module, helps buyers spot a good one, and helps installers avoid the usual problems like blurry edges or a washed-out image.
In this article, I will walk through the light path step by step, explain what “MLA” really means, compare it with the older single-lens approach, and cover the practical issues that decide whether a projection light looks great or disappointing. I will also touch on heat, water, vibration and the legal side, since a motorcycle is a tough place for any optical part.
What Is an MLA Projection Light?
What “MLA” stands for
MLA stands for micro lens array. It is a flat plate covered with a grid of tiny lenses, often only a fraction of a millimeter wide. Think of it as hundreds of small magnifying glasses printed side by side on one piece of glass or plastic.
Each tiny lens does a small job. Together they do something one large lens struggles to do well in a thin package.
How it differs from a basic puddle light
A basic puddle light is often just an LED shining down through a window. It makes a soft glow, not a defined picture. An MLA projection light is closer to a miniature slide projector. It forms a real image of a pattern and focuses it onto the ground.
That difference is why the result looks like a printed logo instead of a blurry spot.
Where you will see it on motorcycles
Manufacturers and accessory brands use these modules for welcome lights, brand logo projection and decorative ground lighting. They are usually mounted under a mirror, beneath a side panel or near the footpeg area, so the image lands beside the bike.
On many models the light is triggered when the bike is unlocked or the ignition is switched on.
How Motorcycle MLA Projection Lights Work, Step by Step
Designs vary between manufacturers, but most follow the same basic path. Here is the typical sequence from light source to ground.
Step 1: The LED creates the light
Everything begins with a small LED. It is bright, compact and efficient, and it can run from the bike’s 12-volt system through a small driver.
The LED sends light out in a wide, messy cone. On its own, that light cannot form a picture. It needs to be organized first.
Step 2: A collimating lens straightens the beam
A collimating or condenser lens sits close to the LED. Its job is to catch the spreading light and turn it into a more parallel beam.
Without this step, much of the light would miss the rest of the optics and be wasted. A good collimator is a big reason an MLA module looks bright without drawing much power.
Step 3: The first lens array splits the beam
Now the straightened light reaches the first micro lens array. This plate divides the beam into many small sub-beams, one for each tiny lens.
Each sub-beam is focused toward its own spot on the next element. You can picture it as splitting one large spotlight into a crowd of tiny ones.
Step 4: The slide carries the pattern
At the center of the module sits the slide, sometimes called a mask or a gobo. It is a thin plate carrying the logo or shape. Light passes through the clear parts and is blocked by the rest.
Slides are commonly made of glass with a metal or dielectric coating, though printed films are also used. The material matters because it sits close to the heat of the LED.
Step 5: The second lens array and projection lens form the image
After the slide, the light meets the second micro lens array and the projection lens. These parts work as a team to image the slide onto the ground.
Each small channel creates its own copy of the pattern. The projection lens then sets the final size, focus and throw distance.
Step 6: The images overlap into one clear picture
This is the clever part. Every channel projects the same image to the same place, so the copies stack on top of each other.
Because many channels contribute, a flaw in one tiny area averages out. The result is a more even and uniform picture than a single lens usually gives, and a thinner module to boot.
An everyday comparison helps. Imagine a choir singing one song. A single voice might crack or wander, but fifty voices together sound smooth and full. The overlapping channels in an MLA behave in much the same way with light.
The Main Components Inside the Module
Knowing the parts makes it easier to judge quality and ask the right questions when you talk to a supplier.
| Component | What it does | Why it matters |
|---|---|---|
| LED light source | Produces the light | Sets brightness and color |
| Collimating lens | Straightens the beam | Reduces wasted light |
| First lens array | Splits light into channels | Helps even out the image |
| Slide or mask | Carries the logo pattern | Defines sharpness and durability |
| Second lens array | Images each channel | Builds the overlapping picture |
| Projection lens | Sets size and focus | Controls throw distance |
| Housing and seal | Protects the optics | Handles water, dust and heat |
The housing is easy to overlook, yet on a motorcycle it may be the part that decides whether the module survives a rainy season.
MLA vs Traditional Gobo Projectors
Before MLA modules became common, most ground projectors used a single-lens gobo design. The two methods can both produce a logo, but they behave differently.
| Feature | MLA projector | Traditional gobo projector |
|---|---|---|
| Module thickness | Usually thinner | Often thicker |
| Image uniformity | Typically more even | Can show a brighter center |
| Optical structure | Multiple small channels | One main lens group |
| Tolerance to small flaws | Averages out across channels | Flaws can be more visible |
| Design complexity | Higher precision needed | Simpler concept |
A traditional gobo projector is a perfectly valid choice, especially for simple designs. But a motorcycle has little spare space, and a thin module that keeps the image even is a strong advantage.
That said, MLA is not automatically better in every situation. It demands tight manufacturing tolerances, and a poorly made array can produce odd artifacts. Quality of execution matters more than the label.
What Decides Image Size, Sharpness and Brightness?
Two motorcycle MLA projection lights can use the same basic idea and still look very different on the ground. These are the factors that usually explain the gap.
Projection distance and mounting height
The image grows as the distance to the ground increases. Mount the module higher, and the logo gets bigger but dimmer, because the same light spreads over a larger area.
Most modules are focused for a target distance. Move too far from that distance and the edges start to soften.
Projection angle
If the module sits at a steep angle, the image can stretch or skew, much like a slide projector aimed at a tilted screen. Good designs account for the expected mounting angle, or the installer must keep the module close to its intended orientation.
Surface and ambient light
A smooth, light-colored surface shows the image best. Dark asphalt, uneven cobblestones or wet ground can reduce contrast or distort the pattern.
Ambient light also matters. A projection that looks sharp in a dim garage may look faint under street lighting or sunlight. This is why demonstrations in shaded showrooms can feel more impressive than real life.
LED power and optical efficiency
The brightness you see on the ground is not just the LED rating. It depends on how much light survives the lenses, the array and the slide.
A well-designed system wastes little light. A poorly designed one can use a strong LED and still look dull.
Lens quality and coatings
Lens surfaces reflect a small portion of light at each interface. Anti-reflection coatings reduce those losses and cut stray light that can blur contrast. This is one area where optical film design makes a visible difference.
Common Uses on Motorcycles
The same optical idea supports several practical and decorative uses.
Brand logo projection is the most popular. Manufacturers use it to reinforce identity every time the rider approaches the bike.
Welcome lighting gives a friendly signal when the bike is unlocked, and it can help a rider see the ground near the footpegs in a dark parking spot.
Accessory and aftermarket lighting lets owners add a personal touch, such as a custom emblem or club logo.
Special editions sometimes include unique projected patterns to set a model apart.
In most of these cases, the light is intended for use when the bike is stationary. That detail becomes important in the legal section below.
Design Challenges for Manufacturers
A projection module that works on a bench can still fail on a bike. Motorcycles are demanding environments, so engineers have to think beyond the optics.
Heat
The LED produces heat, and the slide sits near it. Excess heat can discolor films, soften plastics or shift lens alignment. Metal housings and thoughtful heat paths help, and so does choosing slide materials that tolerate temperature.
Water and dust
Spray from the wheels, rain and car washes are part of normal life. Many designers aim for strong ingress protection, such as an IP65 rating or higher, and use gaskets or sealed lens windows. Condensation inside the module is a classic problem, so sealing and venting need care.
Vibration
A motorcycle shakes constantly. Optical parts that are even slightly loose can drift out of focus over time. Secure mounting, stable adhesives and well-planned optical structure design keep the image sharp after thousands of kilometers.
Electrical stability
A bike’s electrical system has voltage swings and noise. A proper driver keeps the LED steady and protects it from spikes, which also supports longer life.
Tolerance control
Because MLA modules rely on many small channels lining up, the alignment between the arrays, slide and projection lens must be precise. Small errors can reduce sharpness or leave a color fringe along the edges.
For teams building a custom module, optical system design is where these trade-offs are balanced before tooling begins.
Legal and Safety Considerations
Rules about projected light on vehicles differ by country and region. In many places, lamps used on public roads must meet specific lighting regulations, and unapproved projection while riding may be restricted.
Because of that, ground projection lights are generally intended for use when the bike is parked or stationary. A projected image that distracts other road users can cause real problems.
If you are a manufacturer or importer, check the applicable vehicle lighting rules for your target market and consult a qualified homologation specialist. If you are a rider, review your local regulations before installing an aftermarket unit. Nothing in this article is legal advice.
Troubleshooting Common Problems
When a projected logo looks wrong, the cause is usually one of a few things.
The image is blurry. The module may be mounted too far from the ground or too close. The focus is set for a target distance, so adjust the height or check the manufacturer’s recommended range.
The image is dim. Ambient light, a dark surface or a weak driver can all play a part. Test the module in a darker spot to see whether the module or the environment is the issue.
The logo looks stretched. The mounting angle is probably too steep. Reposition the module to match the intended orientation.
Fog or moisture appears inside. The seal may be damaged, or the module was exposed to a rapid temperature change. Moisture can damage the optics, so replace or reseal the unit.
The picture fades over time. The slide material or the LED may be degrading from heat. A better thermal design or a more durable slide usually solves this.
How to Choose a Good Motorcycle MLA Projection Module
If you are selecting a module for a product or an upgrade, a few checks go a long way.
Start with the target projection distance and image size. Confirm that the module is designed for the height at which you plan to mount it.
Ask about the slide material and how it handles heat. Durable, well-coated slides generally keep their contrast longer.
Look at the sealing and the ingress protection rating, and ask how the module was tested for vibration and temperature.
Check the electrical specification, including the input voltage range and driver protection, to make sure it suits your bike’s system.
Finally, ask whether a custom logo is possible and what the lead time is. If you need a tailored design, you can explore the motorcycle MLA projection lighting product page or contact the team to discuss a specific project.
A sample test on a real bike is the best proof. Photos and bench demos rarely show how a module behaves in daylight or in the rain.
Conclusion
When you break it down, how motorcycle MLA projection lights work comes down to a clear sequence. An LED provides the light, a collimator organizes it, two micro lens arrays create many small channels, a slide carries the pattern and a projection lens throws the image onto the ground.
The overlapping channels are what give the picture its even look, and the thin structure is what lets the module fit into a motorcycle’s tight spaces.
But optics alone do not guarantee a good result. Heat control, sealing, vibration resistance and careful alignment decide whether the image stays sharp after months of real riding. And since projection rules vary by region, it pays to check local regulations before using these lights on public roads.
Whether you are designing a new model, sourcing a module or simply curious, knowing the light path helps you ask better questions and make a smarter choice.
FAQs
What does MLA mean in motorcycle projection lights?
MLA stands for micro lens array. It is a plate with many tiny lenses that split and shape light so a logo or pattern can be projected evenly onto the ground.
Is an MLA projector different from a regular logo projector?
The goal is similar, but the optical structure is different. A traditional gobo projector relies mainly on one lens group, while an MLA design uses many small channels whose images overlap. This often allows a thinner module and a more even image.
Why does my projected logo look blurry?
The most common cause is the wrong mounting distance, since the module is focused for a specific range. A steep mounting angle, moisture inside the housing or a loose lens can also soften the image.
Can I use a motorcycle projection light while riding?
That depends on your local regulations. These lights are generally intended for stationary use, such as welcome lighting when the bike is parked. Check your local vehicle lighting rules or ask a qualified professional before using one on public roads.
How long does a motorcycle MLA projection light last?
Lifespan depends on the LED quality, heat management, slide material and sealing. A well-built module with good thermal design and protection from water and vibration will generally last longer than a low-cost unit.